Tuesday, April 11, 2017

SuperTools from WalkMe

SuperTools from WalkMe is Google Extension add-on, so you do not need to install anything in your Salesforce org., or ask your admin to enable it for you.

At this moment, there are 2 main features come from SuperTools offered by WalkMe for free.

1. SuperEdit
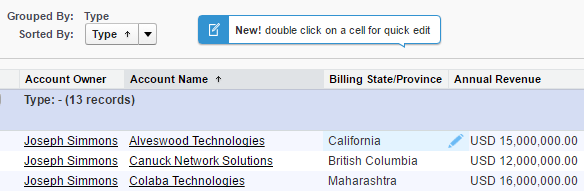
Would it be cool when you can edit data directly in Salesforce report? With this tool, you can do this with ease. It works for Tabular and Summary report in Classic. As per standard Salesforce validation, it will only allow user to edit data they have access, otherwise, you will get an error.

Just install the Google Extension from the link in the reference below and you will see the magic.


Notice a pencil icon shown when you hover your mouse over a report open.

2. SuperSearch
Can't be denied that every Salesforce user should have use Search function, it's pretty cool when you can search any data from a single place. But, with SuperSearch from WalkMe, the search experience would be even powerful, let's see.

This is standard Salesforce global search, recent items you opened earlier will be shown in the search result before you click the Search button.


Compare with addition power from SuperSearch, it will search all records as you typing.


Watch the videos from WalkMe SuperTools site for more detail. But, if you don't like, simply delete the extension and nothing left behind in your Salesforce.


Type: Google Chrome extension

Paid/Free: Free

Publisher: WalkMe

Installationhttps://chrome.google.com/webstore/detail/walkme-extension/fckonodhlfjlkndmedanenhgdnbopbmh

Version: 1.6.22


Blog last update: 11 Apr 2017


Saturday, March 25, 2017

Activity Comments Enabler

By default, we cannot add Activity Comment into related list in Salesforce Classic, user need to click the task or event to see the comment. If you are awesome admin, you think you can create formula field to copy Comment value, but Comment this field is not exist for formula field. Workflow with Field Update to update a custom text field will be the option. As Activity is split into 2 objects: Task and Event, you need to create one custom text field in 'Activity Custom Fields', then 2 workflows and 2 fields update (for each Task and Event).

But, there is a free app available in AppExchange called 'Activity Comments Enabler', you just need to install it and add a field called  'Summary Comment' to the related list.


Activity Comments Enabler gives you a summary of comments in activity history related lists (showing tasks & events) with no clicks at all.
  • Provides a short summary of the first 255 characters of comments on the activity record in any activity related list. Use for tasks and events.
  • Works in Professional Edition so that all users can see a summary of comments on their activity related lists, including both tasks and events.
  • Handles all tasks and events, including those created from integrations and other automation. Will display a summary of comments on all activity history related lists on any object.
  • Activity Comments Enabler allow your users to view a summary of comments in any activity related list on any object. 

This means your users can save valuable time by not having to click through into every task and event or use long printable views to read comments.

Once installed, this app will copy the first 255 characters of Comments into a custom Summary Comments field on any new or updated Tasks and Events. This custom field can then be displayed on related list page layouts. If the Task Type is 'Email', instead of copy the first 255 characters of Comments, it will show as 'Open Task to View Email'.


Type: Unmanaged Package; AppExchange

Paid/Free: free

PublisherCRM SuperStars

Installation: https://appexchange.salesforce.com/listingDetail?listingId=a0N30000000qrQMEAY

Version: 1.0.0


Blog last update: 25 March 2017


Sunday, January 29, 2017

Whitelist All IPs for Salesforce

Salesforce has a great security model for 2 factor authentication and trusted systems.  Sometimes, however, it can be onerous.

If you want to ensure that a user can access Salesforce without requiring a verification code or security token, you need to "whitelist" their IP on Setup => Security Controls => Network Access.

If you have a lot of IPs to whitelist, or you want to whitelist dynamic IPs, or you simply want to disregard this requirement altogether, enter this extension: Whitelist All IPs for Salesforce!

Simply:
1) Enable this plugin
2) Navigate to Setup => Security Controls => Network Access in your Salesforce org (must be an Admin)
3) Click the Whitelist All IPs button
4) Wait!  There is a progress indicator, it can take 30 seconds to 3 minutes depending on your connection.

Type: Google Chrome extension

Paid/Free: Free

Publisherraydehler.com/cloud

Installationhttps://chrome.google.com/webstore/detail/whitelist-all-ips-for-sal/nnlnikmkkbpgioojghgojoejgcheilic?hl=en

Version: 0.0.1


Blog last update: 29 Jan 2017


Friday, January 20, 2017

Salesforce Inspector

The most used Salesforce Chrome extension by Salesforce professionals has been upgraded to version 1.19 with many new/additional features, so get it here Salesforce Inspector reloaded.

A few noticeable changes:

Ability to search for inactive user


Direct link to open Fields, Record Types, and Object List


Ability to add Permission Set and Permission Set Group directly

A brand new UI for Data Export


Shortcuts
Search profile, permission set, settings, flow, etc.
Last update: 19-Jul-2023


Salesforce Inspector is one of the most popular productivity tools for Salesforce admin, to complement the Salesforce DevTools extension.

Productivity tools for Salesforce administrators and developers to inspect data and metadata directly from the Salesforce UI. Extension to add a metadata layout on top of the standard Salesforce UI to improve the productivity and joy of Salesforce configuration, development, and integration work.

What do you get after this extension is installed on your Chrome? A side menu with the arrow icon at the right side of the Salesforce screen.

1. Objects tab
Open the Salesforce inspector arrow will open a quick access menu, by default it will show the Objects tab. If the browser currently opens a record, the record will be automatically pulled, otherwise, you can search it manually:
  • Record Id
  • Id prefix (3 characters) or Object name

This is the Home page, that's why no record is displayed.

Open the panel from an Opportunity record

Click the object name (such as Opportunity in the above screenshot) will open the setup menu in Fields & Relationships for that object, but overwrite the record open, so it is not open into a new tab.


2. Show all data
This is related to (1) if this is related to an object, clicking the "Show all data" button will open the window (overwrite Salesforce page) with the default column: 
- Field API Name
- Label 
- Type (formula field show with * at the end) and click "All fields metadata" at the end of the field will show the complete formula for that field.

If this is related to a record, in addition to the columns in (1), Value will be added here by default.

You can easily find a label or value from this table from the search box.


This screen offers more functions than just search:
  • Edit, click the Edit button at the top to edit all fields, or double-click a cell under Value on a certain row to edit a field, this includes fields that are not added to the page layout
  • Delete, click the Delete button at the top, and the system will prompt you for confirmation to delete.
  • Clone
  • Export, this will open the Export query window, where the Id automatically added as the criteria
  • View record in Salesforce
  • Edit Page Layout, open the page layout used by the record opened
  • Object setup (Lightning), this will open the setup menu in Fields & Relationships for that object.
The above features will only show based on the record/object and user access.

If you see at the further right, there is an arrow next to each row (field), click the arrow and select Field setup (Lightning), this will directly open the field detail in the setup menu.


3. Users tab
This is a fast shortcut when you need to check a user detail or to log in as that user (assume you have permission).


4. Data Export
This will open a SOQL query window, it supports field and objects auto-completion as you type, including and relationship query with the parent object. It also records your query history and you can manually save queries, so you can re-use your previous queries.

Hit the Export button to see the result, type in the filter box to filter the result further, then you can copy the result to Excel, CSV, and JSON


5. Data Import
It supports Insert, Update, Upsert, and Delete, then select the object, format, and paste the file to be imported. The system will try to match the mapping, but you can manually re-map it.


6. Org Limits
You can check the limits consumed for many items, but this does not include limits in an object or automation tool.


7. Download Metadata
You can select what type of metadata to download, I am not advised to Select all, because it will take a lot of time, so just select metadata items that you would like to download, such as report type.

Once completed, simply download the zip file and extract it.


8. Setup Home
Click this menu, simply to open the Setup menu, and that's all.


Type: Google Chrome extension

Paid/Free: Free

PublisherSøren Krabbe

Installationhttps://chrome.google.com/webstore/detail/salesforce-inspector/aodjmnfhjibkcdimpodiifdjnnncaafh?hl=en

Version: 1.12


Blog last updated: 9 Jan 2022


Tuesday, January 3, 2017

LogMachine help to analyze log efficiently

This plugin is for Salesforce debug log, it will help in analyzing the log efficiently by highlighting key important sections in the log and also giving help tips to avoid error.

Once installed to Chrome, nothing to configure, just navigate to your debug log and you will see colorful background color when open the log file.


Type: Google Chrome extension

Paid/Free: Free

Publishergouravrocks247@gmail.com

Installationhttps://chrome.google.com/webstore/detail/logmachine/ngppecjgpbgmfcjjakdjfbnpnihcgpdb?hl=en

Version: 1.1


Blog last update: 3 Jan 2017


Saturday, December 31, 2016

Opportunity Contact Roles Validation

When you have a requirement to make sure, when each Opportunity reach certain criteria, Contact Roles is required, but Opportunity Contact Roles is not available in Workflow, Process Builder, and even Apex Trigger directly.

There are a few options to achieve this:
a). Process Builder on Opportunity and call Flow
On Opportunity when Edit, populate Primary Contact Role to a custom field, then use Validation Rule to make sure the opportunity comply with the rule.

b). 3rd party tool such as Roll Up Helper
Similar to above, use Roll Up Helper to populate Primary Contact Role to a custom field, then use Validation Rule to make sure the opportunity comply with the rule.

c). Write trigger on Opportunity
Similar to above, use trigger on Opportunity to populate Primary Contact Role to a custom field, then use Validation Rule to make sure the opportunity comply with the rule.

If you are too lazy to venture for option a and b, and have no developer for option c. Here is the easiest option by installing an unmanaged free app from AppExchange.

After install this app Opportunity Contact Roles Validation, you will find 2 new fields at Opportunity level and 1 validation rule, by default it would be:
AND( Probability > 30, NOT(Primary_Contact_Assigned__c))
change the rule if you would like to check if Probability is beyond 30%
AND( Probability > 0.3, NOT(Primary_Contact_Assigned__c))

Notes:
- You just need to modify the validation rule to follow your business process
- Because the trigger is on Opportunity, not Opportunity Contact Roles, new contact added to Contact Roles will not immediately effect, but when user edit the Opportunity, it will be re-calculate by Trigger.

This app require Enterprise, Unlimited, Performance edition, when I install into a DE, it give me warning that it will not work.


Type: Unmanaged Package; AppExchange

Paid/Free: free

Publisher: Pactera

Installationhttps://appexchange.salesforce.com/listingDetail?listingId=a0N300000025Vs1EAE

Version: 1.0.0


Blog last update: 31 December 2016