Showing posts with label Free. Show all posts

Saturday, May 30, 2020

CMTD Enhanced Related List

In Summer 19 release, Salesforce introduces Enhanced Related Lists. Enhanced List offers more features compared to the older Basic List or Tile option.

Enhanced Related Lists features:
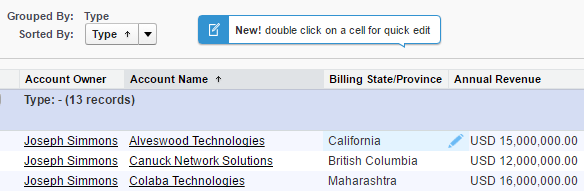
  • Set the number of records to display in the related list
  • Show list view action bar
  • Refresh button
  • Wrap text in the column
  • Resize and sort columns
  • More than 4 fields on the related list (compare to the Basic List)

Tile

Basic List

Enhanced List


But, to filter related list, you have to click "View All" at the bottom of the related list, then click the Filter icon, from there, you can add quick filters to the related list with Filter icon. Related list quick filters act similarly to list view filters except they aren’t saved, persist only throughout your current session, and can’t be shared.


CMTD Enhanced Related List is a “Custom Metadata Type Driven” custom lightning component that provides enhanced features to display related list records in Lightning App.

The component supports configurable filter, sort, and fields to group relevant records together. It supports List and Tile mode with the Lightning look and feels. Use Badge UI Override to highlight important fields to the user.

Use and configure these components on any child objects and boost your lightning implementation. Configure the Filter, Sort, and Fields on this reusable component on any lookup records to group relevant records in a single page (eg: Open and Closed Cases).

First, you need to install this component from AppExchange, as per the Lightning component requirements, you need to enable my domain.

Below is the 3-step process to start using this component:
1. Create configuration data records in the Custom Metadata Type
2. Drag and drop the component in the App Builder
3. Configure component attributes to suit your design

1. Create configuration data records in the Custom Metadata Type


- From the setup menu, go to Custom Metadata Type 
- Click "Manage Records" on Custom Metadata Type created as part of CMDT installed package.
- Click the New button and enter the info, see sample below:


All the above fields will be shown in the CMDT Lightning component. here is the basic explanation:
- Enhanced Related List Name: imagine this as API field name, so not really use in layout
- Label: this would be header label in the table
- Related List Name: this should match with Related List Name in the component
- Field API Name: this is to match values to retrieve from this field
- Order: from left to right
- Target API Name: add value here will allow the user to click and open the record


2. Drag and drop the component in the App Builder
Edit the lightning page and looks for the "CMDT Enhanced Related List" component under Custom - Managed.


3. Configure component attributes to suit your design
Once the component added, click the component to configure it.


In the sample screenshot above, the component added to the Account lightning page:
- Related List Name: this is the same value configured in the Custom Metadata Type 
- Filter is configured in the component, not in Custom Metadata Type 
- Record sort also configured in the component, not in Custom Metadata Type 


Here is the final result:


Type: Managed Package; AppExchange

Paid/Free: free

Publisher: Salesforce Labs


Version: 2.6.0


Blog last updated: 30 May 2020


Monday, October 29, 2018

Profile and Permission Set Helper

When you have a profile assigned to 1 or 2 users with different extra permission compare to other profile, it is a good chance to merge the profile and create a permission set for that 1 or 2 users.

Profile and Permission Set Helper from Salesforce Labs help admin to easily convert existing Profiles permissions in your org to Permission Sets. Within a few clicks, you can clone all Permissions from a certain Profile to Permission Sets, which are ready to be assigned to new users in no time!

Once the app installed, select Profile and Permission Set Helper app, there will be only 1 tab called Converter, then select the profile that you want to convert into Permission Set.

Notes: this app is only work in Lightning.


The conversion process is very fast, only a few seconds, and it will create a new Permission Set as you named it. The existing profile will still be there and not touch.


Now, you can assign the permission set as per normal to users, and delete the profile when required.


Type: Managed Package; AppExchange

Paid/Free: free

Publisher: Salesforce Labs

Installationhttps://appexchange.salesforce.com/appxListingDetail?listingId=a0N3A00000FeF99UAF

Version: 1.5


Blog last updated: 29 October 2018


Wednesday, September 12, 2018

Field Footprint

You probably heard about Field Trip, one of the most famous free app available in AppExchange, this tool able to analyze fields population, this is very useful when you are doing field clean-up or to get data completeness. However, Field Trip has not updated since Jun 2015.

Field Footprint is kind of similar to Field Trip, but with additional features, such as checking record type, field usage in Validation rules, Workflow rules, Workflow Field Updates, and Reports.

On top of that, one thing I notice from this tool compare to Field Trip, when running a Field Trip to analyze an object with 134K of data, Field Trip required 75 minutes, while running Field Footprint analyze to the same of dataset, Field Footprint only need 25 minutes, so the performance is 3x better.

Once complete, you will see the result in the Footprint Detail page, or open Footprint results in a report.


With this tool, you also can check fields usage per record type, click the record type name in the main analysis page, it will tell you how many records for that record type and the population for each field.


Type: Managed Package; AppExchange; Private Listing

Paid/Free: free

Publisher: Salesforce Labs

Installationhttps://appexchange.salesforce.com/appxListingDetail?listingId=a0N3A00000EShrRUAT

Version: 2.8.33


Blog last update: 13 September 2018

Etherios EasyDescribe - Free MetaData Viewer/Extractor

EasyDescribe is a free tool to view and extract "object" metadata details. Don't waste time clicking through multiple screens to lookup record types, field types, picklists, and other metadata. EasyDescribe it and get everything at once!

Once the app installed, select EasyDescribe tab and select an object you would like to extract. You can turn on or off items you would like to extract, from fields, child relationship, and record type.


Type: Managed Package; AppExchange; Private Listing

Paid/Free: free

Publisher: West Monroe Partners

Installationhttps://appexchange.salesforce.com/listingDetail?listingId=a0N300000018leZEAQ

Version: 1.91


Blog last update: 12 September 2018

Saturday, February 10, 2018

Field Dumper: Easily export your Salesforce fields to Excel

Salesforce allowed us to view all fields from an object in a glance, including Field Label, Field Name (API Name), Data Type, Controlling Field, and Indexed. However, sometimes we just need to extract it for different purposes:
- Documentation
- Audit
- To compare all formula
- To get help text for each field
- To export from many objects
- etc.

With Field Dumper, a free tool available in AppExchange, admin can easily export Salesforce Data Model to Excel. Produce an Excel document that lists out your data model - showing field level information for your Salesforce objects. Supports extract of multiple custom and standard objects to one workbook.

This tool works for both Classic and Lightning Experience UI.


The excel file produces may contain multiple tabs, one tab for one object, each tab will have following info:
- API Name
- Label
- Type
- Is Custom
- Is External ID
- Is Unique
- Is Formula
- Is Required
- Dependent Picklist
- Length
- Formula Text
- Help Text
- Picklist Values


Type: Managed Package; AppExchange

Paid/Free: free

Publisher: POP

Installation: https://appexchange.salesforce.com/listingDetail?listingId=a0N3A00000EJg2hUAD

Version: 1.2.0


Blog last updated: 10 February 2018


Friday, November 17, 2017

Show Password

Chrome definitely is the most famous web browser at this moment, and if you are a Salesforce admin, consultant, or developer like me, you probably have many Salesforce login credential. Chrome is smart and makes our life easier by cache the password, so we do not need to remember it or using 3rd party tool to store it. But somehow, we can't see the password directly in the browser, example if we need to login using Data Loader or Salesforce mobile app.


1. From Setting Menu
As Chrome setting menu is keep changing by the versions, rather than to memory which menu should I go, just search with "password" from the settings menu, go to Settings and type "password", it would filter just menu related to password, then select "Manage passwords".


This will list down all username and the password (in masked) stored in Chrome, click Show password (eye icon) to see the password, Chrome will ask your Google password for security.


2. ShowPassword Chrome extension
As you may aware that Chrome has so many extension develop by people around the world, and most of them are free. There is an extension called ShowPassword built for the purpose to reveal the masked password in Google Chrome.

When this extension added to your Chrome, by default, you just need to hover your mouse over the masked password text for 0.5 seconds to reveal the password, or you also can change the way to reveal the masked password.


Type: Google Chrome extension

Paid/Free: Free

Publisher: a1618@love.com

Video: https://www.youtube.com/watch?v=71vyCtuFn-I

Installation: https://chrome.google.com/webstore/detail/showpassword/bbiclfnbhommljbjcoelobnnnibemabl?hl=en

Version: 1.1.5


Blog last updated: 17 Nov 2017


Sunday, August 27, 2017

FOLDERIZE - provide alternative Folder Structure for Salesforce

Salesforce introduces sub folder in Library since Summer '17 release, but you can only add the subfolder from Lightning Experience, also you cannot see all folders and subfolders in a glance, you have to open each folder to see the subfolders underneath.


While in earlier Summer '15 release, we can use Salesforce Sync desktop agent, create folders and subfolders created in the desktop, and it will sync to Salesforce as folders too, this works for both Classic and Lightning. But same as the folder in Library, you need to click each folder to see subfolders underneath.


This screenshot was taken from Classic.


Folderize provides the ability to create folder hierarchies of unlimited levels, drag files or add library documents to the folders. It provides a view of all folders and sub folders in a glance, and work in both Classic and Lightning. You can add documents to Folderize from both library and files.


Type: Managed Package; AppExchange

Paid/Free: free

Publisher: ShareMethods


Version: 4.04


Blog last updated: 27 August 2017


Thursday, August 24, 2017

AddressTools Free

By default, State and Country in Salesforce are textbox fields, but Salesforce provides a feature to make State and Country as picklist, admin need to enable and configured it properly. Once the setup was done, instead of manually typing in the country and state name, the user just select from State and Country values defined, check out this blog related to this.

However, to implement standard State and Country picklist, admin need to clean all existing data, existing State and County must be clean with values defined. It will also cause data from all integration and data load must be clean, when inserting and update to Salesforce, the value must follow defined values, otherwise, an error will be thrown, such as FIELD_INTEGRITY_EXCEPTION - There's A Problem With This Country, Even Though It May Appear Correct. Please Select A Country/territory From The List Of Valid Countries.: Country.

With AddressTools Free, this tool will ensure your users enter consistent address region names with an auto-complete pick-list & additional validation features. No need to clean your existing data before implementing, clean as you go knowing all new data is validated.


Once the package installed and configured, you need to install the have extension for each of your user too, check out this document, if you are using Google Chrome, here is the extension.

They also provide the same functionality through VisualForce pages without the need for a browser extension, however, this feature is reserved for premium users.

At this moment, AddressTools only support in Classic, but I believe they are working on a Lightning release. 


 Type: Managed Package; AppExchange

Paid/Free: free

Publisher: ProvenWorks

Installation: https://appexchange.salesforce.com/listingDetail?listingId=a0N30000001SqRFEA0

Version: 5.56


Blog last updated: 25 August 2017


Thursday, August 17, 2017

Map Lead Source field on Lead object to Account Source field on Account object during Lead conversion

In this blog Lead Field Conversion Mapping written almost 4 years ago, we shared about standard fields mapping when a lead is converted to Account, Contact, and Opportunity.

By default, Lead Source is not mapped to Account Source, only to Contact and Opportunity, and you can't just simply configure the field mapping. You can follow this article by creating custom fields, configure the lead fields mapping, and workflow.

With this free managed package app "Lead Source Mapper" by CRM SuperStars, admin just needs to install the app, no extra fields and etc. need to be configured. When a lead is converted to new Account, the Account Source will be auto populated from Lead Source. If you convert the lead to existing Account and Account Source have value, it will not change. But if the existing Account Source is blank, the new value from Lead will update the Account Source.

Now, when you open Account or run a report from Accounts with Account Source, the Lead Source value from lead will be in Account.


 Type: Managed Package; AppExchange

Paid/Free: free

Publisher: CRM SuperStars

Installation: https://appexchange.salesforce.com/listingDetail?listingId=a0N3A00000EFmslUAD

Version: 1.2


Blog last updated: 17 August 2017


Wednesday, August 2, 2017

Quick ChangeSet & Navigator

We blog about Google Chrome extensions that can be used to help us when building Change Set: Salesforce Change Set Helper and Boostr for Salesforce, both of them are free.

Here is another free Google Chrome extension that can make our life easier when adding Change Set Components, it called "Quick ChangeSet & Navigator".

This extension help to add components into Change Set without having to load each page as well as navigating Component Type and paging in Salesforce.

Here is the simple step by step:
1. Create a new Change Set or open existing Change Set haven't upload
2. Click Add button, make sure you are in "Add to Change Set" page, otherwise, the tool will not work.
3. Click "Quick ChangeSet" icon from Google Chrome extension bar
4. Select the component by change filter and paging, this is pretty fast as the page not keep reload


Type: Google Chrome extension

Paid/Free: Free

Publisher: sanjaykeynotes.blogspot.com

Video: https://www.youtube.com/watch?v=71vyCtuFn-I

Installation: https://chrome.google.com/webstore/detail/quick-changeset-navigator/jhoddpnaknifeinaojmahfmbgephkodj

Version: 1.0.2


Blog last updated: 2 Aug 2017


Sunday, July 30, 2017

Salesforce: Printable View from a Record in Lightning and Classic

So you have migrated to Lightning, then you realize that your users complain where is the "Printable View" after a record open a record, such as Account, Opportunity, or etc. Yes, as per Summer '17 release, Salesforce Lightning does not have "Printable View" function yet.

To fill this gap, HyTech Pro created a free app and make available in AppExchange. This app is compatible with Lighting and Classic.

The benefit of using this app in Classic is the ability to change Salesforce's logo with your own company/organization logo, but you need to add a custom button (installed with the package) to the page layout.


In Lightning, you need to add "Printable View" action to "Salesforce1 & Lightning Actions" in object Page Layout. As you see from the screenshot below, the action will work even you are not opening the record details tab.


Type: Managed Package; AppExchange

Paid/Free: free

Publisher: HyTechPro

Installation: https://appexchange.salesforce.com/listingDetail?listingId=a0N3A00000EFom3UAD

Version: 1.3


Blog last update: 30 July 2017


Sunday, May 7, 2017

Salesforce Change Set Helper

Salesforce Change Set Helper is a Chrome extension to improve the usability of Salesforce Change Sets. It allow Change Set with additional information, such as last modified date, last modified by, etc. It also allows comparison the component with other org.

Features include: 
 - Includes the last modified date and user and api name for each item.
 - Automatically ordered by most recent modified first
 - Filter/Search/Order by any field.
 - Sets all pages to show the 1000 rows.  If more than 1000 items in a page, asks if you want to continue to retrieve more.
 - View and Search on items in the change set.  This allows you to see the whole change set and search to make removing much easier.
 - Compare to another org (uses OAuth2.0 -- no username or password information is seen or stored by this extension).
 - Shows the last modified date and user for the compared org as well.
 - Click the file name to see a diff of the metadata file between orgs.

Note that there is a delay when loading large pages and you may need to disable other chrome extensions that alter the change set page.

To use the Salesforce Change Set Helper, edit your Outbound Change Set in Salesforce. The additional information and functionality will automatically be added to the page.

This is standard Salesforce Change Set when you want to add component:


When Change Set Helper added and enabled


You also can compare the component with other org.


Type: Google Chrome extension

Paid/Free: Free

Publisherbrainfield.initiative@gmail.com

Installationhttps://chrome.google.com/webstore/detail/salesforce-change-set-hel/gdjfanbphogooppaefebaaoohdcigpoi

Version: 2.0.2


Blog last updated: 7 May 2017


Fake Data

This Google Chrome extension is not specific for Salesforce usage only, but it will work for both Classic and Lightning. This will help you that need to keep entering fake data for some testing.


Fill form input fields with fake random data.
- Fill form input fields on the fly with fake random data.
- Zero configuration needed out of the box, just cmd+double click / alt+double click on each input you want to fill.
- Has an auto-learn feature for unrecognized fields.
- Power users are able to define their own custom generators using JS code.

Keyboard + Mouse Shortcut:
OS X: Cmd + Double click
Windows / Linux: Alt + Double click

If the field is not recognized:
If a field is not recognized automatically, then right-click on it -> go to Fake Data -> select the appropriate generator that you want to be used with that field in the future.

Next time you double click on the same field it will be recognized automatically.


Type: Google Chrome extension

Paid/Free: Free

Publisher: Hater Apps

Installation: https://chrome.google.com/webstore/detail/fake-data/gchcfdihakkhjgfmokemfeembfokkajj

Version: 1.6.0


Blog last update: 7 May 2017


Tuesday, April 11, 2017

SuperTools from WalkMe

SuperTools from WalkMe is Google Extension add-on, so you do not need to install anything in your Salesforce org., or ask your admin to enable it for you.

At this moment, there are 2 main features come from SuperTools offered by WalkMe for free.

1. SuperEdit
Would it be cool when you can edit data directly in Salesforce report? With this tool, you can do this with ease. It works for Tabular and Summary report in Classic. As per standard Salesforce validation, it will only allow user to edit data they have access, otherwise, you will get an error.

Just install the Google Extension from the link in the reference below and you will see the magic.


Notice a pencil icon shown when you hover your mouse over a report open.

2. SuperSearch
Can't be denied that every Salesforce user should have use Search function, it's pretty cool when you can search any data from a single place. But, with SuperSearch from WalkMe, the search experience would be even powerful, let's see.

This is standard Salesforce global search, recent items you opened earlier will be shown in the search result before you click the Search button.


Compare with addition power from SuperSearch, it will search all records as you typing.


Watch the videos from WalkMe SuperTools site for more detail. But, if you don't like, simply delete the extension and nothing left behind in your Salesforce.


Type: Google Chrome extension

Paid/Free: Free

Publisher: WalkMe

Installationhttps://chrome.google.com/webstore/detail/walkme-extension/fckonodhlfjlkndmedanenhgdnbopbmh

Version: 1.6.22


Blog last update: 11 Apr 2017


Saturday, March 25, 2017

Activity Comments Enabler

By default, we cannot add Activity Comment into related list in Salesforce Classic, user need to click the task or event to see the comment. If you are awesome admin, you think you can create formula field to copy Comment value, but Comment this field is not exist for formula field. Workflow with Field Update to update a custom text field will be the option. As Activity is split into 2 objects: Task and Event, you need to create one custom text field in 'Activity Custom Fields', then 2 workflows and 2 fields update (for each Task and Event).

But, there is a free app available in AppExchange called 'Activity Comments Enabler', you just need to install it and add a field called  'Summary Comment' to the related list.


Activity Comments Enabler gives you a summary of comments in activity history related lists (showing tasks & events) with no clicks at all.
  • Provides a short summary of the first 255 characters of comments on the activity record in any activity related list. Use for tasks and events.
  • Works in Professional Edition so that all users can see a summary of comments on their activity related lists, including both tasks and events.
  • Handles all tasks and events, including those created from integrations and other automation. Will display a summary of comments on all activity history related lists on any object.
  • Activity Comments Enabler allow your users to view a summary of comments in any activity related list on any object. 

This means your users can save valuable time by not having to click through into every task and event or use long printable views to read comments.

Once installed, this app will copy the first 255 characters of Comments into a custom Summary Comments field on any new or updated Tasks and Events. This custom field can then be displayed on related list page layouts. If the Task Type is 'Email', instead of copy the first 255 characters of Comments, it will show as 'Open Task to View Email'.


Type: Unmanaged Package; AppExchange

Paid/Free: free

PublisherCRM SuperStars

Installation: https://appexchange.salesforce.com/listingDetail?listingId=a0N30000000qrQMEAY

Version: 1.0.0


Blog last update: 25 March 2017


Sunday, January 29, 2017

Whitelist All IPs for Salesforce

Salesforce has a great security model for 2 factor authentication and trusted systems.  Sometimes, however, it can be onerous.

If you want to ensure that a user can access Salesforce without requiring a verification code or security token, you need to "whitelist" their IP on Setup => Security Controls => Network Access.

If you have a lot of IPs to whitelist, or you want to whitelist dynamic IPs, or you simply want to disregard this requirement altogether, enter this extension: Whitelist All IPs for Salesforce!

Simply:
1) Enable this plugin
2) Navigate to Setup => Security Controls => Network Access in your Salesforce org (must be an Admin)
3) Click the Whitelist All IPs button
4) Wait!  There is a progress indicator, it can take 30 seconds to 3 minutes depending on your connection.

Type: Google Chrome extension

Paid/Free: Free

Publisherraydehler.com/cloud

Installationhttps://chrome.google.com/webstore/detail/whitelist-all-ips-for-sal/nnlnikmkkbpgioojghgojoejgcheilic?hl=en

Version: 0.0.1


Blog last update: 29 Jan 2017


Friday, January 20, 2017

Salesforce Inspector

The most used Salesforce Chrome extension by Salesforce professionals has been upgraded to version 1.19 with many new/additional features, so get it here Salesforce Inspector reloaded.

A few noticeable changes:

Ability to search for inactive user


Direct link to open Fields, Record Types, and Object List


Ability to add Permission Set and Permission Set Group directly

A brand new UI for Data Export


Shortcuts
Search profile, permission set, settings, flow, etc.
Last update: 19-Jul-2023


Salesforce Inspector is one of the most popular productivity tools for Salesforce admin, to complement the Salesforce DevTools extension.

Productivity tools for Salesforce administrators and developers to inspect data and metadata directly from the Salesforce UI. Extension to add a metadata layout on top of the standard Salesforce UI to improve the productivity and joy of Salesforce configuration, development, and integration work.

What do you get after this extension is installed on your Chrome? A side menu with the arrow icon at the right side of the Salesforce screen.

1. Objects tab
Open the Salesforce inspector arrow will open a quick access menu, by default it will show the Objects tab. If the browser currently opens a record, the record will be automatically pulled, otherwise, you can search it manually:
  • Record Id
  • Id prefix (3 characters) or Object name

This is the Home page, that's why no record is displayed.

Open the panel from an Opportunity record

Click the object name (such as Opportunity in the above screenshot) will open the setup menu in Fields & Relationships for that object, but overwrite the record open, so it is not open into a new tab.


2. Show all data
This is related to (1) if this is related to an object, clicking the "Show all data" button will open the window (overwrite Salesforce page) with the default column: 
- Field API Name
- Label 
- Type (formula field show with * at the end) and click "All fields metadata" at the end of the field will show the complete formula for that field.

If this is related to a record, in addition to the columns in (1), Value will be added here by default.

You can easily find a label or value from this table from the search box.


This screen offers more functions than just search:
  • Edit, click the Edit button at the top to edit all fields, or double-click a cell under Value on a certain row to edit a field, this includes fields that are not added to the page layout
  • Delete, click the Delete button at the top, and the system will prompt you for confirmation to delete.
  • Clone
  • Export, this will open the Export query window, where the Id automatically added as the criteria
  • View record in Salesforce
  • Edit Page Layout, open the page layout used by the record opened
  • Object setup (Lightning), this will open the setup menu in Fields & Relationships for that object.
The above features will only show based on the record/object and user access.

If you see at the further right, there is an arrow next to each row (field), click the arrow and select Field setup (Lightning), this will directly open the field detail in the setup menu.


3. Users tab
This is a fast shortcut when you need to check a user detail or to log in as that user (assume you have permission).


4. Data Export
This will open a SOQL query window, it supports field and objects auto-completion as you type, including and relationship query with the parent object. It also records your query history and you can manually save queries, so you can re-use your previous queries.

Hit the Export button to see the result, type in the filter box to filter the result further, then you can copy the result to Excel, CSV, and JSON


5. Data Import
It supports Insert, Update, Upsert, and Delete, then select the object, format, and paste the file to be imported. The system will try to match the mapping, but you can manually re-map it.


6. Org Limits
You can check the limits consumed for many items, but this does not include limits in an object or automation tool.


7. Download Metadata
You can select what type of metadata to download, I am not advised to Select all, because it will take a lot of time, so just select metadata items that you would like to download, such as report type.

Once completed, simply download the zip file and extract it.


8. Setup Home
Click this menu, simply to open the Setup menu, and that's all.


Type: Google Chrome extension

Paid/Free: Free

PublisherSøren Krabbe

Installationhttps://chrome.google.com/webstore/detail/salesforce-inspector/aodjmnfhjibkcdimpodiifdjnnncaafh?hl=en

Version: 1.12


Blog last updated: 9 Jan 2022


Tuesday, January 3, 2017

LogMachine help to analyze log efficiently

This plugin is for Salesforce debug log, it will help in analyzing the log efficiently by highlighting key important sections in the log and also giving help tips to avoid error.

Once installed to Chrome, nothing to configure, just navigate to your debug log and you will see colorful background color when open the log file.


Type: Google Chrome extension

Paid/Free: Free

Publishergouravrocks247@gmail.com

Installationhttps://chrome.google.com/webstore/detail/logmachine/ngppecjgpbgmfcjjakdjfbnpnihcgpdb?hl=en

Version: 1.1


Blog last update: 3 Jan 2017


Wednesday, December 21, 2016

Premier Primer

This app is intended for Premier Success Plans customers and their admins to store important Premier information and useful Premier Education Assets.

Learn what the Premier experience is all about with this app designed for customers who want to get the most out of Premier benefits and services.
  • Store your Premier support passcodes and support numbers in a centralized location
  • Quickly access educational assets to help you take full advantage of your Premier experience
  • Discover new ways for your company to leverage the Premier program and realize value through programs and offerings tailored to your needs

Premier Primer shows you how to get up to speed quickly with recommended steps and stores your unique Premier customer codes and support contact information.


Type: Managed Package; AppExchange; Private Listing

Paid/Free: free

Publisher: Salesforce

Installationhttps://appexchange.salesforce.com/listingDetail?listingId=a0N3A00000EShZhUAL

Version: 1.6.0


Blog last update: 21 December 2016


Monday, December 19, 2016

Limits Monitor

This app built by Salesforce for admin to see the limit from iOS device. Limits monitor gives you a clear view of your technical limits and get in front of potential issues. Limits Monitor provides real-time tracking and configurable notifications for your Salesforce instance from your phone. This app Requires iOS 10.0 or later.

As of now - version 1.3, we can monitor 23 limits, includes daily storage, API calls and events with hourly reports, dashboard refreshes, emails, and so on.


Here is the items you can check from the app:
1. Concurrent Asynchronous Report Runs
2. Concurrent Durable Streaming API Clients
3. Concurrent Streaming API Clients
4. Concurrent Synchronous Report Runs
5. Daily API Requests
6. Daily Asynchronous Apex Executes
7. Daily Bulk API Requests
8. Daily Durable Generic Streaming API Events
9. Daily Durable Streaming API Events
10. Daily Generic Streaming API Events
11. Daily Streaming API Events
12. Daily Workflow Emails
13. Data Storage
14. File Storage
15. Hourly Asynchronous Report Runs
16. Hourly Dashboard Refresh
17. Hourly Dashboard Result
18. Hourly Dashboard Status Requests
19. Hourly OData Callouts
20. Hourly Synchronous Report Runs
21. Hourly Time-Based Workflow
22. Mass Emails
23. Single Emails
24. Daily Bandwidth Limit**
25. Daily Request Time Limit**

** this last two items is available in version 1.2, but removed in version 1.3


Type: App Store / iOS

Paid/Free: free

Publisher: Salesforce

Installationhttps://itunes.apple.com/us/app/limits-monitor/id1169185218

Version: 1.3


Blog last update: 21 December 2016